A new record is added in an Insert workspace; existing records (returned by a search) are edited in an Editing workspace.
To add a record to a module:
- On the Dashboard, select the module's button in the Command Centre.
This will open a Search workspace for the selected module:

- Select the Create New button on the left of the Workspace toolbar (or use the
CTRL+Ckeyboard shortcut) to open an Insert workspace:
Here you add details for a new record in the current module:
- Select a tab in the Tabs pane on the right.
- Expand each Field Group and add details to the fields.
Tip: Select the Find Field button in the Workspace toolbar to locate any field in the current module. Details here.
Working with fields in an Insert workspace is essentially the same as in an Editing workspace, and you will find details about working with each type of field below.
Editing records
When a record is in Details View (you've run a search and selected a record), it can be edited.
To edit a record:
-
Select the Edit button (or use the
CTRL+Ekeyboard shortcut):
The record opens in an Editing workspace:

 Understanding the Editing workspace
A record can only be edited in one workspace
Understanding the Editing workspace
A record can only be edited in one workspace
If you return to the Search workspace and click the Edit button for a record that is already open in an Editing workspace, one of two things will happen:
- If the record has not yet been edited, the Editing workspace for that record will get focus.
-
If the record has been edited and your changes are unsaved, a message will display:

- Continue editing: the Editing workspace for that record will get focus with your changes unsaved.
-OR-
- Save changes: your changes are saved and the Editing workspace for that record will get focus.
This ensures that a record can only be open and edited in a single location.
- Continue editing: the Editing workspace for that record will get focus with your changes unsaved.
In the example above, a record in the Parties module is open in an Editing workspace. The current tab is Person and a Field Group, called Party Type, is ready to be edited:
1. Show / Hide fields
Select to expand a Field Group and show its fields and data. Select again to collapse and hide the Field Group.
2. Tabs
The Tabs pane can be shown or hidden:
- Select
 to display available tabs.
 - Select a tab in the list to display its fields.
3. Options
These options are available for the current record
The record currently displayed in Details View or highlighted in List View (there is a faint dotted line around it). It is only possible to have one current record at a time.: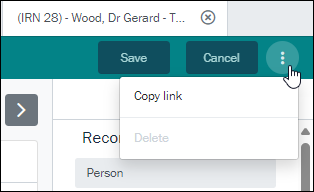
Options include:
Options
Details
Copy link
When Axiell Go is deployed using HTTPS (all data transmitted is encrypted) it is possible to copy the link to a record, which can then be shared and pasted into a browser to open the record.
Note: This option is disabled where Axiell Go is deployed using HTTP.
Delete
Forthcoming functionality.
4. Show / hide list of Tabs
Maximize screen real estate when editing fields by selecting
 to hide the Tabs pane.
Alternatively, select the
 above the list of Tabs.
The icon changes to
. Select it again to display the Tabs pane. - Make your changes to the record.IMPORTANT: if necessary, undo changes BEFORE saving the record
If you need to undo changes you make to a record, you can do so BEFORE saving the record by selecting the Cancel button, which is located beside the Save button. A message will display asking you to confirm that you want your changes discarded:

Note: Suitably authorized users are able to restore a record to an earlier state using the EMu desktop client.
How you edit a field depends on the type of field:
What type of field is this?Field Type
Details

An Attachment field links the current record
The record currently displayed in Details View or highlighted in List View (there is a faint dotted line around it). It is only possible to have one current record at a time. to another record in the same or another module. An Attachment field can be identified by the magnifying glass  icon: to make a link, we search for the required record.
Date fields are identified by the Calendar icon
 .
.
Lookup Lists are identified by the following icon
 .Attachment fields
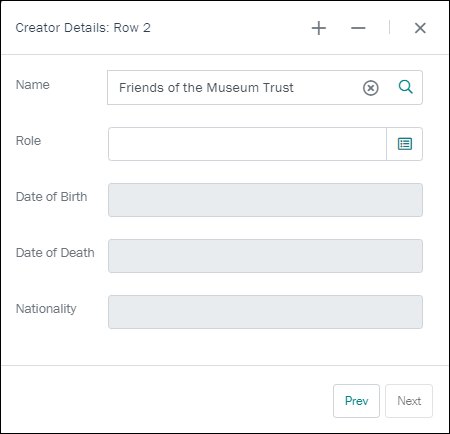
An Attachment field links the current record
The record currently displayed in Details View or highlighted in List View (there is a faint dotted line around it). It is only possible to have one current record at a time. to another record in the same or another module. An Attachment field can be identified by the magnifying glass icon.To make a link, we search for the required record by entering a value in the Attachment field. In this example, the Name field links to a record in the Parties module:
Enter a value in the field and click the field icon or press the ENTER key:
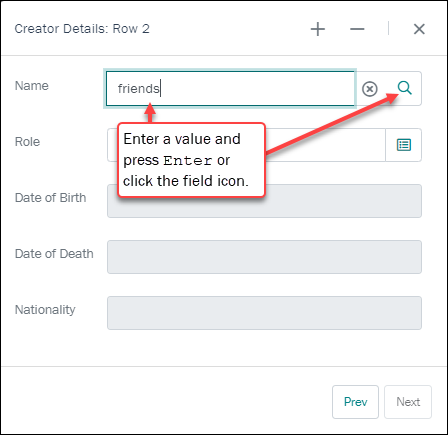
- If only one result matches the value entered, the field is auto-completed:
- If more than one value matches, a popup displays with a list filtered to potential matches. Select a value to enter it in the field:
Date fieldsDate fields are identified by the Calendar icon
. The required format for the date is indicated:The simplest way to add a date is to key it in the format shown:

As we see, when the cursor is in a date field, several tools become available offering alternative ways to enter a date.
One option is to tap / click each component of the date (e.g. dd), and use
 to increase / decrease the number.
Alternatively, select a date from the calendar:
- Click / tap the arrow
 to reveal the calendar.
 - Select the month / year:
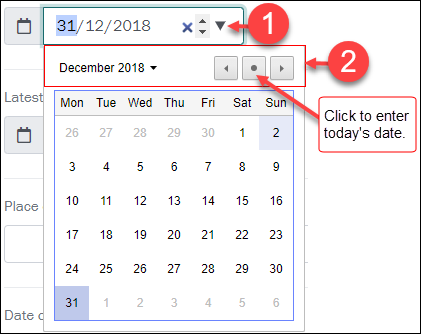
Either:
- Use the arrow heads to move forward / back by one month per click / tap:

- Click / tap the required day.
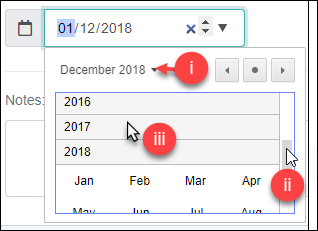
Or:
- Click / tap
 beside the current month & year to reveal a scrollable list of years.
 - Scroll back / forwards to another year.
- Select the required year:
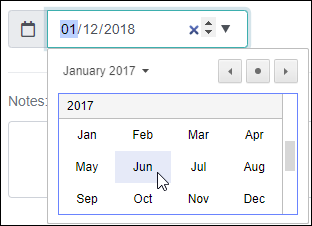
- Select the required month:
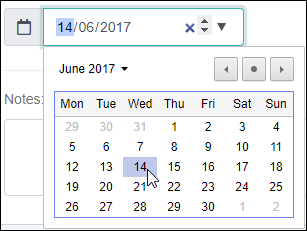
- Select the required day:
- Use the arrow heads to move forward / back by one month per click / tap:
Lookup ListsLookup Lists are identified by the following icon
:About Lookup Lists: good practice and permissionsAlso known as a Pick List or Authority List, a Lookup List is a list of the values that have either been used or are suggested for use in a field. Rather than keying a value into the field, it is possible to pick a value from the Lookup List. Benefits of selecting a value from a Lookup List rather than keying a value directly into a field include:
- Less typing.
- Consistent spelling of values entered in fields.
- Use of the correct (approved) terminology when running a search or editing a record, e.g.
Sales PersonnotSalesman.
Permissions assigned to Lookup Lists determine whether you can add values to the list and, if so, whether you are prompted to confirm any new value added:
- ReadOnly - you must use an existing value and cannot add a new value to the Lookup List.
- ReadWrite (with prompt) - you can add values to the Lookup List but will be prompted before a new value is added.
- ReadWrite (without prompt) - you can add values to a Lookup List and can do so without being prompted.
To select a value from a Lookup List
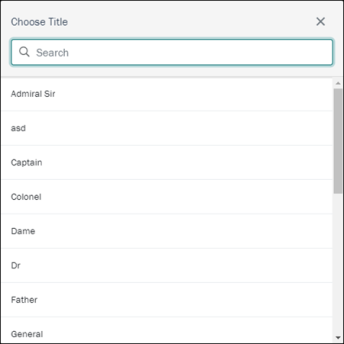
- Tap / click the Lookup List button in a field.
A popup selection box will display with a list of values suggested for the field:
 (Optional) Filter a Lookup List by entering letters before opening the Lookup Selection box
You can reduce the number of values that display in a Lookup Selection box by entering letter(s) into a Lookup List field before opening the Lookup Selection box.
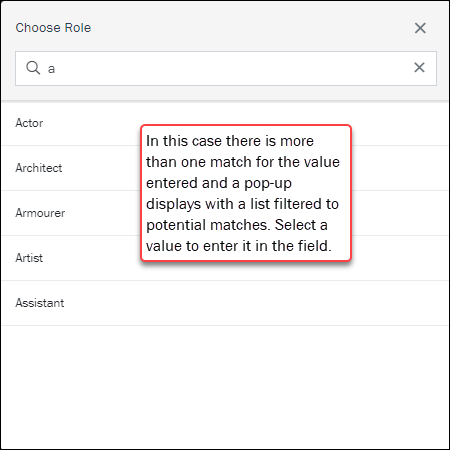
For example, if you enter a in the Role field:
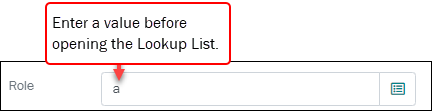
and press Enter or click the Lookup List
button, when the popup displays, it will be filtered to values starting with a: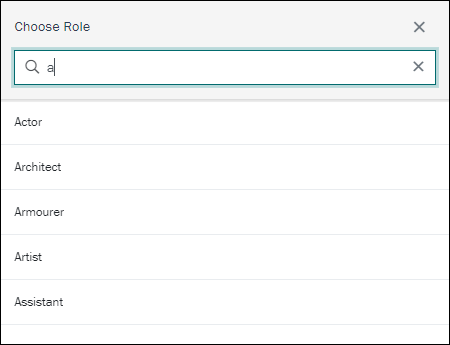
If there is only a single match for the value entered, the popup will not display and the field will auto-complete1. In this example we enter
actand press ENTER:
As only one value matches, the field is auto-completed:

- Locate the value you are after by scrolling through the list (use the scroll bar or the keyboard arrow keys)
-OR-
Begin entering the required value in the Search field; the list of values will be filtered as you key letters.
- Tap / click the required value.
The selected value will be entered into the Lookup List field.
If the value you want to enter is not in the Lookup List and you have permission to enter the value, simply key the value into the field:
- If the Lookup List is ReadWrite, the value will be added to the Lookup List when the record is saved.
- If the Lookup List is ReadOnly, you will not be able to save the new value and will need to select an existing value.
More details about Lookup Lists can be found here.
MultimediaAbout Multimedia in EMuIn EMu, multimedia is stored and managed in a Multimedia module. The Multimedia module complies with the Dublin Core Metadata Standard and the complete Dublin Core attribute set can be recorded for each multimedia resource. Records in almost every module can include multimedia resources; and there is no limit to the number of multimedia resources that can be included with a record, nor the type of those resources.
Multimedia resources can be added to records in EMu in several ways, including:
- Creating a record in the Multimedia module for the resource and then attaching the record to any other record.
- Adding the multimedia to a record in any EMu module; this will automatically create a record for the resource in the Multimedia module.
The second of theses methods, described below, is used in Axiell Go.
See the EMu Help for details about:
System Administrators will find details about Multimedia Registry entries here.
Multimedia is managed on the Multimedia tab in most EMu modules. Here we see a record in Details View (a record was selected following a search):

When viewing record details we have the option to:
- Select a thumbnail to view the image in a popup window.
- Select the Download
 icon to download the media file to your device's Downloads folder.
Here we see a Parties record being edited:

When adding a new record or editing an existing record, the following options are available when working with multimedia:
1. Options (Sort and Remove media from the current record)Options include:
 Remove selected
This option will only display if the tick (3 in the image above) is selected for one or more resources.
- Select the tick for one or more resources.
The tick will appear filled:

- Select Remove Selected Media.
The number in brackets indicates the number of selected resources.
Any ticked resources are removed from the record.
Note: Resources are only removed from the record; they are not removed from the database and can still be added to records.
Sort mediaThe Sort media option is faded and disabled until more than one resource is added to the current record:
- Select Sort Media.
Icons display beneath each resource thumbnail:

- Drag and drop a resource to a new position by selecting
 (hold down the icon, drag to the new location and release).
-OR-
Click an angled bracket (< or >) to move the resource to the left or right of its current position (if possible):

- Select Done.
Remove All MediaSelect this option to remove all media from the current record.
Resources are only removed from the record; they are not removed from the database and can still be added to records.
Resources can also be removed using the Resource options (see below).
2. Resource options (Download and Remove)Each resource includes an options icon. Options include:
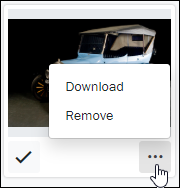
- Download
Download the multimedia resource to your device.
- Remove
Remove the resource from the current record.
Note: The resource is only removed from the record; it is not removed from the database and can still be added to records.
3. Select a resource (for further processing)Select (tap / click) the tick in order to perform various actions on the resource.
The tick will appear filled:
Once selected, various options become available (see 1 above).
4. Upload media and attach it to the current recordThe Upload Media option is used to upload a single media file to Axiell Go and attach to the current record:
Select Upload Media to display the Upload New Media window:
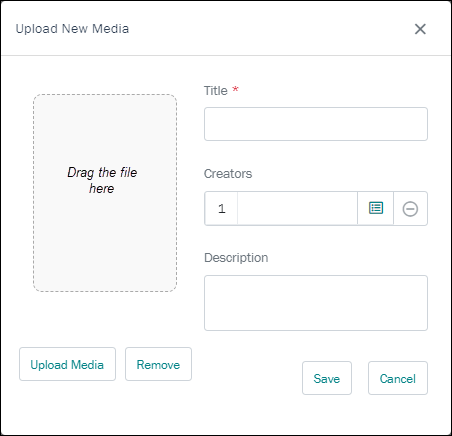
- Drag a media file from your device to the area indicated (Drag the file here), or click Upload Media to locate the file on your device.
- Add a title to the Title field.
Adding a title is mandatory when uploading media as it greatly facilitates searching for media in the Multimedia module
- (Optional) Click the Lookup List icon in the Creators field and search for the Parties record of one or more creators of the media (details about working with Lookup Lists can be found here).
- (Optional) Add a description of the media in the Description field:
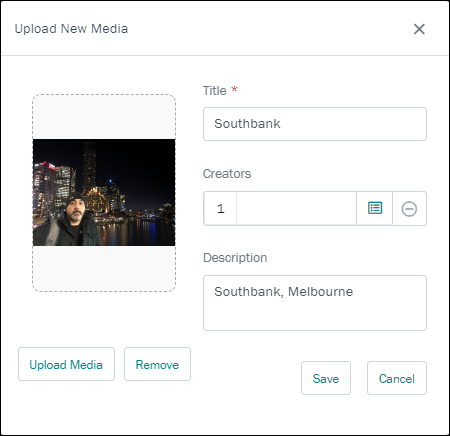
- Select Save:
Note: It is not possible to save new media without uploading a file AND providing a title.
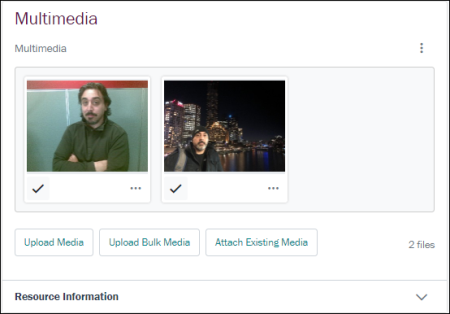
- The resource is uploaded to Axiell Go.
A record is created in the Multimedia module for the resource and attached to the current record:
What happens when a resource is uploaded to Axiell Go?Axiell Go is a web interface to your EMu Collections Management System (CMS) and changes you make in Axiell Go update your EMu CMS.
When multimedia resources (images, documents, etc.) are added to EMu it is possible to generate alternative formats (derivatives) automatically. When an image is added to EMu for instance, it is possible to generate different image formats and sizes automatically to satisfy different requirements: a thumbnail JPEG can be generated for browsing, an 800x600 PNG image for publication on the web, whilst maintaining the image in its original format and resolution.
In the previous example, an image
gerard.jpgwas attached to the current record in Axiell Go. Behind the scenes, in the EMu Multimedia module, we can see that seven derivatives were automatically generated:
Details about Multimedia and automatic generation of derivatives can be found here.
5. Upload Bulk media: upload multiple new media at one timeThe Upload Bulk Media option is used to upload multiple media files to Axiell Go and attach them to the current record:
- Select Upload Bulk Media to display the Open (or equivalent) dialogue box will display.
- Locate and select one or more file (on your local file system, network drive, cloud, etc.).
- Select Open (or the equivalent button in the dialogue box) or double-click the selected resource(s):
- The media file or files are uploaded to Axiell Go.
A record is created in the Multimedia module for each resource and attached to the current record.
6. Attach existing media to the current recordSelect Attach Existing Media to locate and attach an existing Multimedia record to the current record (the media resource you want to attach to the current record is already recorded in the Multimedia module). The Attach media box will display with a list of available media:

- Either:
- Enter a search term in the Search field; the list of media will filter automatically to matching media as you enter a search term.
-OR-
- Scroll through the list to locate the required media.
- Enter a search term in the Search field; the list of media will filter automatically to matching media as you enter a search term.
- Select the Attach button for one or more resources.
The resource is added to the current record and the Attach button changes to Remove:
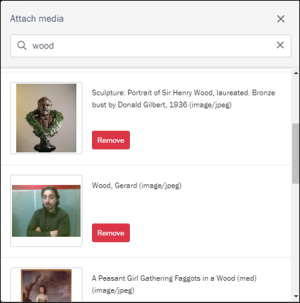
Tip: If you add the wrong resource, select Remove.
- Close the Attach media box by selecting the X in the top right of the box, or click anywhere off the Attach media box:

TablesTables are used where a field can hold multiple values.
A table can be simple and have only one column (one value per row), or it can have multiple columns (multiple values per row).
A good example of a single column table is Other Names: (Person Details) in the Parties module (on the Person Tab):
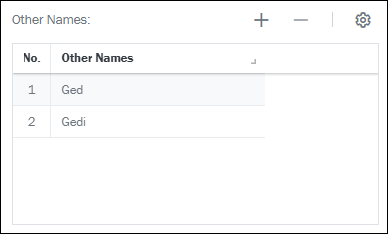
To change a value in a single column table, simply click the row and edit the value:
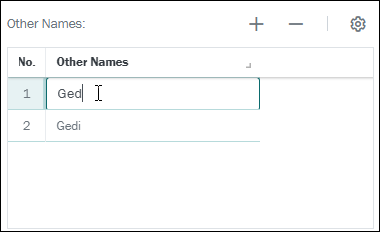
Click
 (or use the
 CTRL+=shortcut) to add a new row to the table; click (or use the
 CTRL+-shortcut) to remove the current row and its data from the table.A good example of a multi-column table is Associated With in the Parties module (on the Associations tab). Each row holds details about an associated party, including a link to a Parties record, the role of the linked party, as well as start and end dates for the association:
 Table options
Icon / Button Purpose
Description 
Resize a column
- Select and hold the column icon .
The cursor will change to indicate that the column can be resized:

- Drag left or right to increase or decrease the width of the column, and release.

Table settings
Select
to display the Column settings box:- Column Order - where there is more than one column, change the order of columns in the table:
- Drag and drop to reorder: select the hamburger icon in a row
 and drag; release.
-OR-
- Select the appropriate arrow head to move a column up or down the order:

- Drag and drop to reorder: select the hamburger icon in a row
- Show / Hide
Select a row to show / hide a column (the tick toggles on to show / off to hide a column):

Data is added and edited to a multi-column table in a popup window:
- To add a row to a multi-column table, click the Add row icon (or use the keyboard combination, CTRL+=).
- To edit data in an existing row in a multi-column table, click that row.
In both cases, a popup window displays:

Add values to the fields as usual. In this case:
- Party is an Attachment field (details here).
- Role is a Lookup List (details here).
- The other fields are Date field (details here).
Options in the popup window include:
Icon / Button Keyboard shortcut
Purpose
Description CTRL+=
Add a row
To add another row to the table, click the Add row icon, or use the keyboard combination, CTRL+=.
CTRL+-
Delete row
To remove the current row and its data, click the Delete row icon, or use the keyboard combination,CTRL+-.


CTRL+left arrowCTRL+right arrowDisplay the previous / next row
When you have added more than one row to the table, the Prev and Next buttons are enabled, allowing you to move back and forth between rows.

Close the popup
As you add values (and rows) to the popup window, the table is updated. Click Close to close the popup when you're done.
Nested tables
A good example of a Nested table (a table within a table) is Assigned to on the Tasks tab:

Assigned to is an attachment field:

To attach to a record, start entering a value and press
TAB; if a single record matches, the field will auto-complete, otherwise a popup will display in which you select the required value. Here we see how to remove a row from a nested table and how to add another row: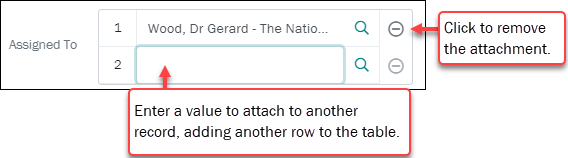 Text fields
Text fields appear similar to this:

Simply enter text into the field.
- Select Save (or use the
CTRL+Skeyboard shortcut).All new records or changes to existing records must be saved and validated before being added to the database. Record validation occurs when a record is saved:
Record validationData entered into fields is validated as it is entered (in some cases) or when a record is saved. This does not guarantee that the data entered is accurate, but does guarantee that:
- The data entered into a field is appropriate for that field, i.e. a date has been entered in a date field.
- Mandatory fields have been completed. If a mandatory field has been missed, you'll be prompted to go back and complete it.
- A value cannot be added to a read-only Lookup List. If a value has been entered into a read-only Lookup List field and that value is not already in the Lookup List, you will be prompted to go back and select an existing value.
Only after the record passes validation is it added to the database.
Validation is performed on:
Subject to validation:
Explanation
A value must be entered into every mandatory field. If not, you will be prompted to go back and complete the field before the record can be saved.
A Lookup List can be set up so that only users with appropriate access can add new values. If a value is added that is not in the Lookup List, you will be prompted to change or save the value depending on what permissions you have been granted.
A new Lookup List hierarchy combination may generate several prompts so that you must validate each new level of the hierarchy.
Tip: Although it is not possible to reverse changes once the record has been saved, suitably authorized users are able to restore a record to an earlier state using the EMu desktop client.
Delete a record
It is not currently possible to delete records from within Axiell Go. Suitably authorized users are able to delete records using the EMu desktop client.